The eFAST Exam (Trauma)
Summary of indications, technique and findings in clinician-performed, bedside ultrasound for traumatic injuries. Adapted from the Partners In Health Manual of Ultrasound for use by health care providers.
Goals
Views
Technique
Right upper quadrant
Left upper quadrant
Pelvic
Subxyphoid cardiac
Anterior chest wall
Pearls and pitfalls
Goals
In the rapid evaluation of the trauma patient:
- Identify free intrathoracic fluid
- Identify free intraperitoneal fluid
- Identify pericardial effusion
- Identify pleural effusion and pneumothorax
Probe: curved/phased array
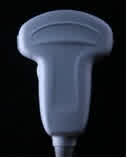
Views
- Right upper quadrant
- Left upper quadrant
- Pelvic
- Subxyphoid cardiac
- Anterior chest wall
Right upper quadrant
Technique
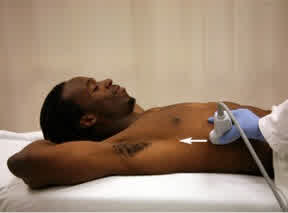
- Place the transducer in the mid-axillary line between the 8th and 11th ribs and point the index marker toward the patient’s head or right posterior axilla.
- Adjust the probe position by rotating it and moving it up or down a rib space in order to get the liver, kidney and Morison’s pouch into view.
- Adjust the transducer so it points slightly more toward the patient’s head and look for free fluid cephalad to the diaphragm. The diaphragm is a hyperechoic structure, and pleural fluid will appear as an anechoic stripe above the diaphragm.
- Move the probe down below the 11th rib mid-axillary line and point the index marker to the right axilla. From this view you can identify fluid in the right paracolic gutter and right pararenal retro-peritoneum. Retro-peritoneal free fluid will appear as a hypoechoic stripe adjacent to the psoas muscle along the inferior pole of the kidney.
- Slide the probe superior in the mid axillary line towards the patient’s axilla in order to see above the diaphragm to assess for pleural effusion or hemothorax. This will appear dark/hypoechoic just above the hyperechoic /white border of the diaphragm.
Normal Findings
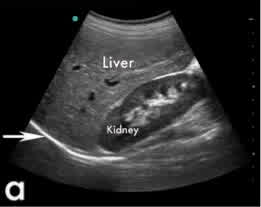
Morison’s pouch view including the diaphragm (arrow), liver, and kidney
Abnormal Findings
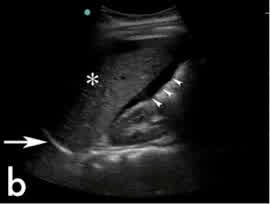
Blood in Morison’s pouch
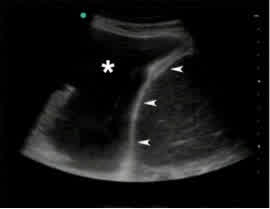
Pleural effusion above the diaphragm
Left upper quadrant
Technique
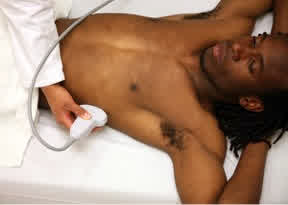
- Place the abdominal transducer in the left posterior axillary line between the 8th and 11th ribs. The knuckles of your hand should touch the bed to assure proper positioning. The index marker should be pointing toward the patient’s head or left posterior axilla.
- Adjust the probe position by rotating it and moving it up or down (superior or inferior) a rib space in order to get the kidney and spleen into view. If you see the kidney first, move the probe up a rib space to find the spleen. The left kidney is more difficult to identify because it sits higher in the abdomen, stomach and colon gas often obscure views, and the spleen is a smaller acoustic window. Asking the patient to take a deep breath may improve the view.
- Adjust the transducer so it points slightly more toward the patient’s head and look for free fluid cephalad to the diaphragm. The diaphragm is a hyperechoic structure, and pleural fluid will appear as an anechoic stripe above the diaphragm.
- Move the probe down below the 11th rib mid to posterior-axillary line and point the index marker to the left axilla. From this view one can identify fluid inferior to the left kidney.
Normal Findings
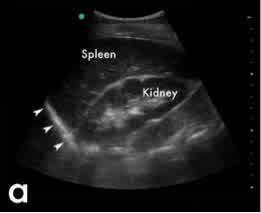
Normal LUQ view including the diaphragm (arrowheads), spleen and kidney
Abnormal Findings
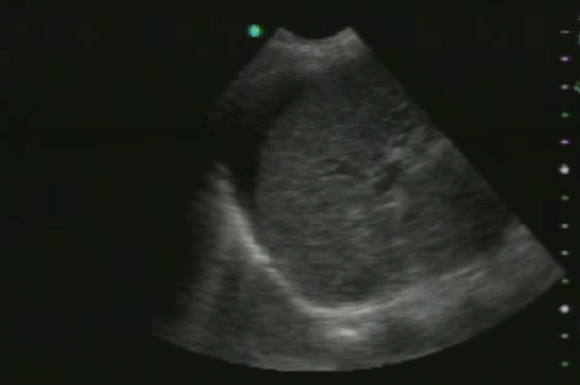
Blood between Diaphragm and Spleen
Pelvic
Technique
Note: these views are best done before a Foley catheter is inserted into the bladder.
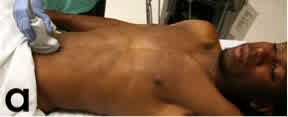
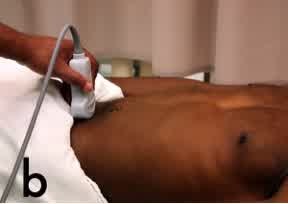
- Place the abdominal probe 2 cm superior to the pubic symphysis in a longitudinal sagittal plane (labeled “a”) with the index marker pointing toward the patient’s head.
- Probe position for longitudinal (a) and transverse (b) views of the pelvis.
- Scan longitudinally, inspecting the bladder and prostate or uterus. Look for free fluid.
- Rotate the probe 90 degrees so that the index marker is pointing to the patient’s right (labeled “b”).
- Scan through the bladder vertically inspecting bladder, prostate or uterus. Look for free fluid.
- Lower the far gain to decrease the brightness of the image deep to the bladder. This will make it easier to see fluid collecting in that space.
Normal Findings
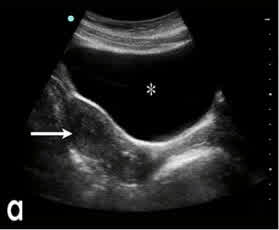
Normal pelvic view showing the uterus (arrow) and bladder (*)
Abnormal Findings
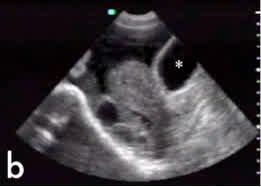
Blood in the pelvis of a trauma patient, outside of the bladder (*).
Subxyphoid cardiac
Technique
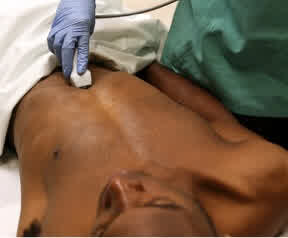
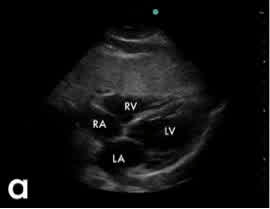
Place the probe in the subxyphoid area and angle it toward the patients left shoulder. The index marker will be pointing toward the right shoulder. From this position, one should be able to get a coronal four chamber view.
Scan the heart to identify an anechoic fluid stripe between the heart muscle, which appears grey on ultrasound, and the hyperechoic pericardium.
If you are unable to view the heart with the subxyphoid view, you can use parasternal long, parasternal short or apical four chamber views (see the Cardiac section for more information) to inspect for pericardial effusion.
Normal Findings
Abnormal Findings
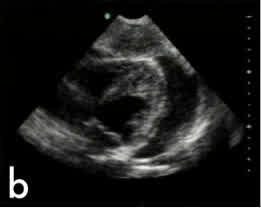
A pericardial effusion is found by looking for an anechoic stripe around the heart within the parietal and visceral layers of the pericardial sac.
Anterior chest wall
Technique
Note: This portion of the eFAST may be conducted with either the linear transducer (which provides better visualization of the pleural interface and pleural sliding) or curved array (more convenient as it is used for the rest of the FAST exam) probe.
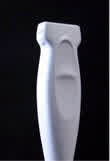
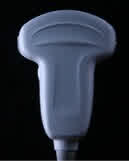
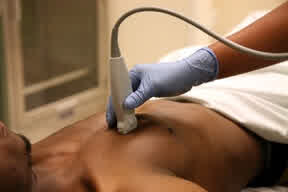
- Place the linear transducer over the anterior chest, mid-clavicular in the first intercostal space in which you can identify the pleural line between two ribs.
- The index marker should point toward the patient’s head in the sagittal plane.
- Look for the pleural interface flanked by rib shadows. Center the image between two rib spaces.
- Look for pleural sliding with respirations. This will look like movement along the bright white/hyperechoic pleural line.
- Look for comet tail artifacts, described as hyperechoic shining lines coming downward off the pleural line towards the bottom of the ultrasound screen.
- If it looks like there is no pleural sliding, or it is a difficult study, use M mode to look for the seashore or stratosphere sign (as described in the Abnormal Findings section).
- Repeat steps 3-6 in three additional intercostal spaces on each side.
If a pneumothorax is present, place the patient on oxygen, consider chest radiography and placement of a chest tube.
Normal Findings
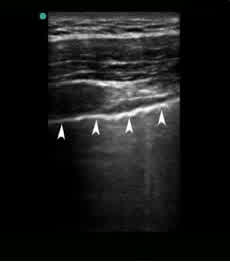
Hyperechoic pleural line (arrowheads)
Seashore sign
In M mode, the motion of the pleural sliding will produce a grainy pattern deep to the chest wall-lung interface. The grainy pattern resembles sand on a beach, and the pattern of the stationary chest wall resembles waves in a body of water.
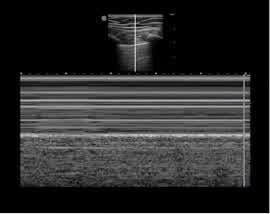
Normal M mode pleural tracing – aka “Seashore sign”
Comet tail artifacts
Artifacts that normally arise from interlobar septae under the visceral pleura. Comet tails appear as hyperechoic lines beginning at the pleural line and extending downward.
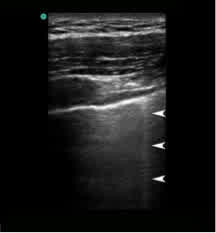
A comet tail artifact (arrowheads) seen in normal lung
Abnormal Findings
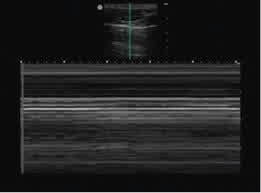
In M mode, a pneumothorax will not produce a grainy pattern, as with the seashore sign, but a continued pattern of horizontal lines deep to the chest wall lung interface. This is called the “stratosphere sign.”
The absence of comet tail artifact may indicate a pneumothorax.
Pearls and pitfalls
- The FAST exam does not adequately evaluate the retroperitoneum, and does not assess for bowel/stomach/other hollow viscous injury.
- Ultrasound cannot differentiate between ascites and hemoperitoneum.
- The FAST exam should be used to rule in rather than rule out hemoperitoneum. There must be at least ~300cc of fluid in the abdomen in order to reliably detect with US – lesser amounts may be missed.
- Place the patient in Trendelenberg (head-down) position to increase fluid flow to dependent spaces of Morison’s pouch and splenorenal recess, and consider a serial exam after 15-30 minutes to improve sensitivity to find fluid.
- A negative pericardial ultrasound does not rule out pericardial effusion in cases of concurrent lacerations of the pericardial sac.
- If the patient has stable vital signs and no evidence of spinal injury following the initial FAST exam, smaller pleural effusions can be identified by having the patient sit up.
- In patients with pleural adhesions from previous pathology, such as obstructive lung disease from long- standing tobacco use or history of pleurisy, lung sliding may not be detected, even in the absence of a pneumothorax.