Underwater Chest Drain Insertion (Thoracostomy)
Management guidelines for students, interns and registrars on a variety of routine and emergency situations in our neonatal service at Tygerberg Children’s Hospital. Published in 2014.
Removing the underwater drain (UWD)
Indications
- Pneumothorax
- Pleural effusions (hydrothorax ,chylothorax and haemothorax)
Requirements
- Sterile UWD-set
- Nr 8, 10 or 12 FG pleural drainage tube
- Suture material (black silk)
- Disinfectant
- Sterile gloves, jacket and mask
Procedure
Swab the area at the proposed drain insertion point (usually 3rd - 4th intercostal space in the anterior axillary line or
the 2nd - 3rd intercostal space in the midclavicular line) sterile with disinfectant.
Infiltrate the area with 1% lignocaine.
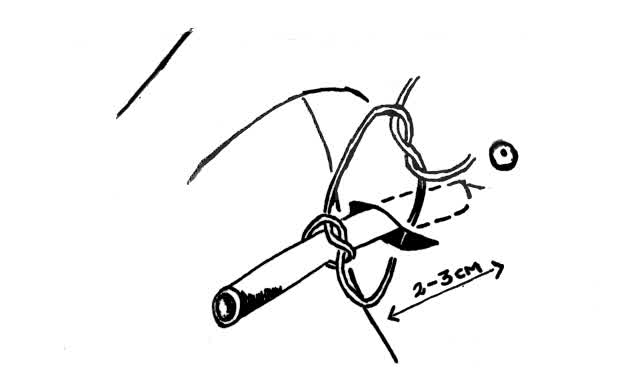
Make a small incision in the skin with a blade just above the rib in the selected area. Dissect bluntly with an arterial forceps until the pleural space is entered. Insert the drain (without the trocar) advancing 2 - 3 cm (suture material should be used to mark the point prior to insertion as shown in the sketch). The drain is now sutured to the skin using a skin suture and knot as shown. The underwater drain is now “pulled closed” against the skin.
Do not secure the under water drain with plaster tape or Micropore®. It may impair chest wall movement.
Disinfect incised area with povidone ointment.
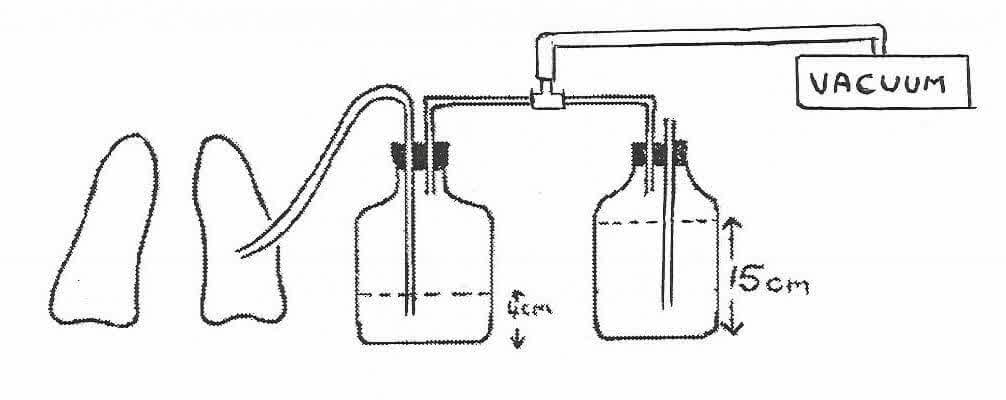
Apply low pressure negative suction to the drain (-15 to - 20 cm H2O) (See sketch below).
Precautions
Do not make an incision in the region of the areola (especially in the case of girls).
Removing the underwater drain (UWD)
INDICATIONS
- No bubbles or “swinging” of the UWD observed.
- The latest CXR shows no pleural air.
METHOD
- Clamp one UWD at a time and repeat the CXR after 6 - 12 hrs.
- If no pneumothorax is observed, remove the UWD.
- Cover the wound with small pieces of dry gauze and plaster. Do not use a tobacco pouch stitch as it results in ugly scars.
- A follow-up CXR is indicated.