Intra-Osseous Infusion in Emergencies
Intra-Osseous Infusion in Emergencies
During resuscitation and when managing a critically ill child, if intravenous access is not established within 5 minutes, obtain intra-osseous (IO) access.
- Use an intra-osseous needle or if not available, a FG18 x 1.5 cm (or less ideally FG20 x 1.5 cm) or lumbar puncture needle.
- Grasp the thigh and knee above and lateral to the insertion site with the palm of the left hand (if right-handed). Wrap the fingers around the knee to stabilise the proximal tibia. Do not allow any portion of your hand to rest behind the insertion site.
- Find the site of insertion, i.e. feel the tibial tuberosity. The site of insertion is about 2 cm below this tuberosity on the broad flat medial surface of the tibia.
- Careful surgical preparation of the injection site as for lumbar punctures.
- Insert the needle through the skin over the flat surface of the tibia.
- Holding the needle low down near the skin, advance the needle through the bony cortex of the tibia, directing the needle perpendicular, i.e. 90° to the long axis, using a gentle but firm twisting or drilling motion.
- Stop advancing the needle when a sudden decrease in resistance to forward motion of the needle is felt.
- Remove the stylet from the needle.
- Slowly inject a small amount of sodium chloride 0.9% through the needle. Check for any signs of increased resistance to injection, increased circumference of the soft tissues of the calf, or increased firmness of the tissue.
- If the test injection is successful, disconnect the syringe and join an infusion set to the needle. Secure the needle and tubing with tape and support it with a bulky dressing.
- If the test injection is unsuccessful, i.e. infiltration of the sodium chloride 0.9% into the leg tissue is observed, remove the needle and try again on the other leg.
- The flow rate should rapidly increase after flushing through. If flow is poor, consider the use of a 3-way tap and syringe.
- Secure the IO needle to the skin by using forceps/spatula/cord-clamp, clamping the IO needle perpendicular to the leg and place two-plaster straps over the forceps/cord-clamp/spatula. Do not cover the leg with a circumferential dressing, as you need to watch the calf for signs of compartment syndrome.
Signs of successful insertion:
- Sudden decrease in resistance to insertion as the needle passes through the bony cortex.
- The needle remains upright without support.
- Fluid flows freely through the needle without evidence of subcutaneous infiltration.
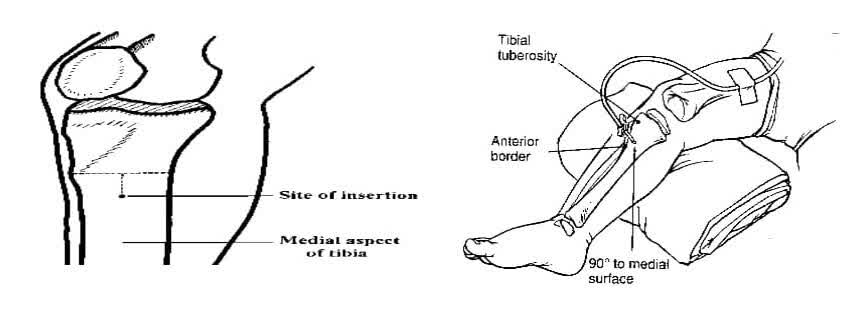
Click on image to enlarge
Automated hand-held intra-osseous access devices are increasingly available and their use allows for the rapid attainment of vascular access in almost all children – when available, their use is strongly encouraged and should be consistent with the manufacturer’s instructions. The same landmarks are used as for manual insertion and the procedure is less painful. For older children (>40kg) the proximal humerus can be used as an access site.
Aspiration and rapid infusion may be painful; lignocaine 0.5mg/kg can be slowly infused as analgesia.
Standard Treatment Guidelines And Essential Medicines List For South Africa, Hospital Level, Paediatrics, 2023 Edition
Chapter 1: Emergencies and Trauma, 1.1 Paediatric Emergencies, 1.1.10 Intra-osseous Infusion In Emergencies